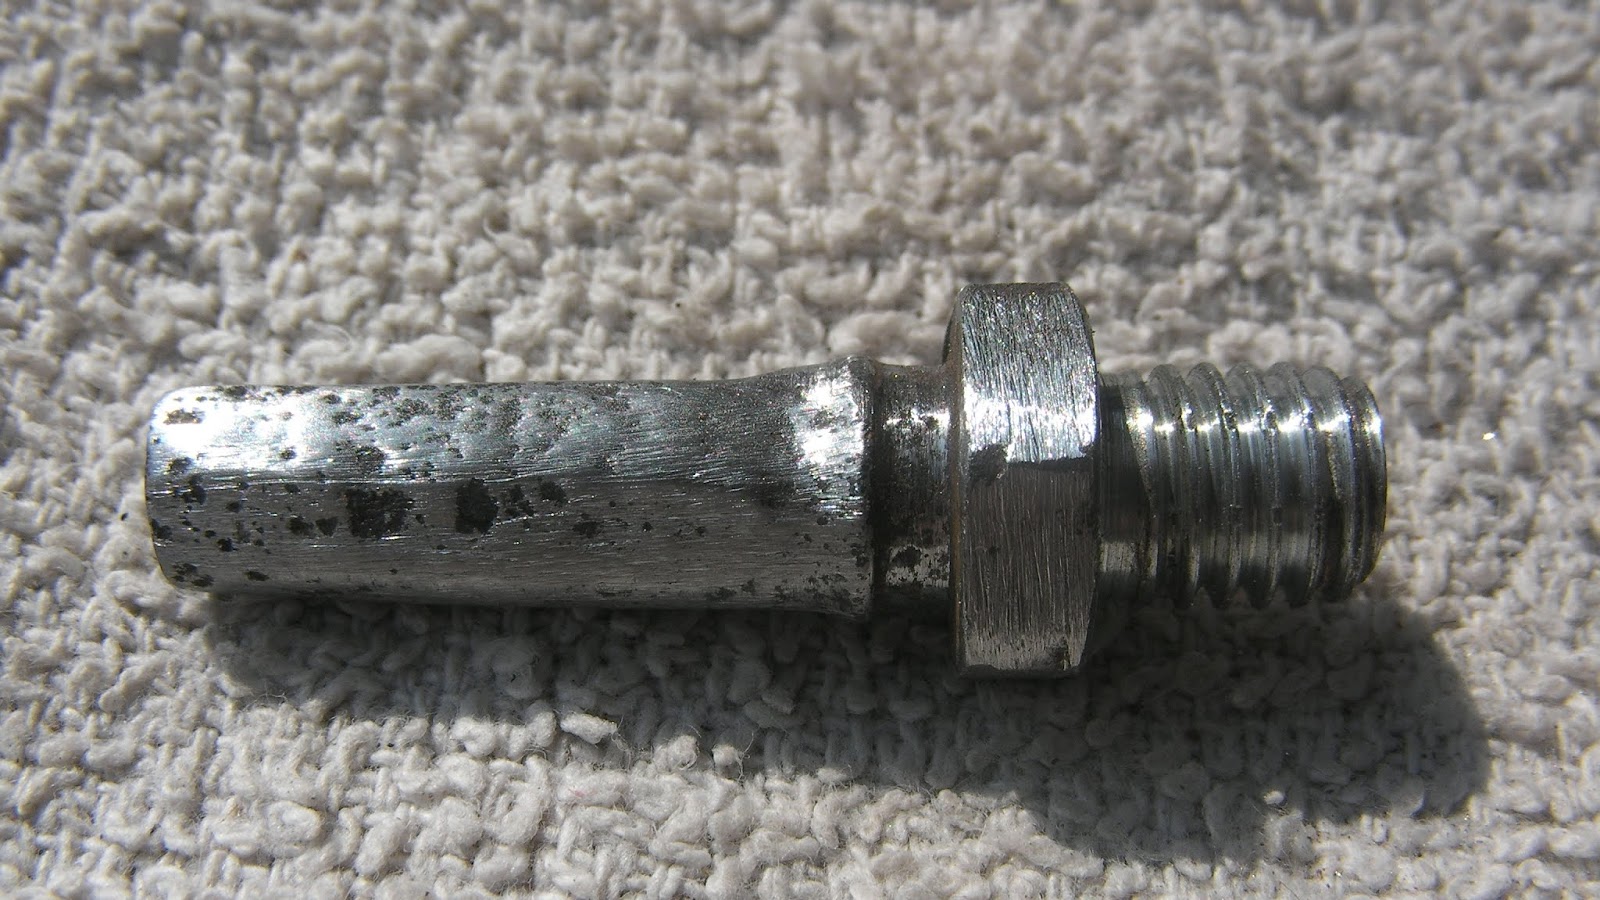
One of the largest challenges I faced when rebuilding the Calipers from Hell was getting the hangar pin cover out. The hangar pin itself is threaded through the two brake pads that go into the front calipers, ensuring that they are securely fastened to the unit. Once the hangar pin has been installed, a pin cover is used to further fill the hole left behind. My inability to get the hangar pin cover out completely stalled the caliper rebuild for about a week, because I couldn't figure out a way to get the hangar pin cover out without damaging it to the point where I would need to do something drastic, like drill it out. The hangar pin cover is a proportionately large, wide and shallow screw type fitting that goes into the hole that is left over after the hangar pin has been installed. Its apparent function is to make sure that that the hangar pin, which has a recessed 5mm hex head fitting, doesn't get filled up with brake material and grime and resultingly difficult to remove. Why is the hangar pin cover such a problem? The main reason why is because the caliper body is made of aluminum, whereas the pin cover is made of steel. These two differing metals not only have different thermal characteristics, they also have electrochemical characteristics that give them a tendency to bond together, particularly in the presence of water.
The idea of a pin cover is a great idea, except for the fact that the pin cover tends to get seized in the caliper, becoming an even greater removal problem than the hangar pin itself. The removal of the hangar pin cover is further complicated by its design: It features a very wide and very shallow slot that requires a huge flat-headed screwdriver, of a size that most people don't normally have in their toolbox (9.5mm wide). So what people do is use a smaller screwdriver which then skips out of the slot, chewing up an already alarmingly shallow slot in the head of the screw. It only takes a few failed attempts to make the screw head useless, turning a bad situation into a horrible one.
Getting the hangar pin cover out of the front caliper is a very common challenge for people who restore older Honda motorcycles. There are many techniques around to get the pin cover out (Heat, Drilling, Impact), but the technique that worked for me was using a penetrating oil for a few days, then a properly sized screwdriver with a six-sided shaft, an adjustable wrench, and the strength of two men to generate a lot of torque, maybe 60lbs or 80lbs worth. That did the trick! Once I got the hangar pin cover out, it took just a few seconds (but an equal amount of torque) to get the actual hangar pin out. With that accomplished, I was faced with a choice: Refurbish or Replace. Ultimately, even though replacement parts are not terribly expensive, I decided that it would be more entertaining to refurbish these two parts and replace them only if the refurbished units didn't work out. That not only served to lower the cost of bringing EZ-RIDER back into service, it also provides people with an opportunity to see how they might refurbish parts that may be even more difficult to source than EZ-RIDER, which is not exactly an easy motorcycle to source parts for, considering it's the last edition of a small displacement model only distributed in Japan and the UK.
One thing I made sure of was to deepen the slot on the hangar pin cover by about 50% using a little cutting wheel in my moto-tool, to give the next screwdriver in line more meat to work with. I would also probably use a vice next time to secure the pin in place, or take it out while the calipers are still on the forks of the motorcycle.
Enjoy!
Help a Maker Out?
Did you see anything in this video you want for yourself? If the answer is yes, consider using one of the link(s) below to buy it directly from amazon.com. When you do, I get a small commission that keeps me going!
Bill of Materials
GLOVEWORKS HD Industrial Black Nitrile Gloves - 6 mil, Latex Free, Powder Free, Diamond Texture, Disposable, Large, GWBN46100-BX, Box of 100 https://amzn.to/35fifrv WD-40 Multi-Use Product Non-Aerosol Trigger Pro Spray. 20 oz. [1-Pack] https://amzn.to/30h2nmN Bondhus 22199 Hex L-wrench DoublePK,Long Length,12137 .050-3/8" & 12199 1.5-10mm https://amzn.to/2Ec80Zs Felo 0715750274 1/2" Series 800 Slotted Screwdriver, 8" https://amzn.to/365QQYO Trident Silicone Grease Jar https://amzn.to/38GjiDg Disposable Chopsticks, pack of 40 pair https://amzn.to/3979cLK Mazbot 6" Cushion Comfort Foam Grip Beading Awl https://amzn.to/2ZjDwOL 15 pieces Scratch Brush (Stainless Steel + Brass+Nylon), AFUNTA Curved Handle Masonry Wire brush Set Bristle for Cleaning Welding Slag and Rust,5 pcs Per Type https://amzn.to/2rvQFYK BLACK+DECKER RTX-6 2 Amp 3-Speed Rotary Tool https://amzn.to/2rHBJ9S Dry Wet Sandpaper by Heylure, 45PCS 9 x 3.6" Silicon Carbide, 120 to 5000 Grit Sandpaper Sheets Assortment, for Metal Sanding, Automotive Polishing, Wood Furniture, Wood Turning Finishing https://amzn.to/36AhUj5 Utopia Towels 12 Pack Dish Towels, 15 x 25 Inches Ultra Soft Cotton Dish Cloths, Blue https://amzn.to/34rdwC1 FIXKIT 7-in-1 Portable Workbench, Multifunctional Folding Work Table Scaffold/Dolly/Platform with 4 Wheels for Garage https://amzn.to/2QVtrVE
Finding parts for EZ-RIDER, a Japanese Edition of a relatively small displacement motorcycle (VT250CR / M29) has proven to be a somewhat "challenging" task. I find myself slowly being forced into the position where I must refurbish parts that I might otherwise prefer to replace, because my motorcycle is not as popular and accessible as other models. Case in point is the parts needed to refurbish the front brake calipers, which I believe includes the following parts: 1 064510-GE2-405 SEAL SET, PISTON 4 43353-461-771 CAP, BLEEDER 6 45108-ML7-922 SPRING, PAD (NISSIN) 8 45112-MS9-611 RETAINER 9 45131-ML7-921 BOLT A, PIN 10 45131-166-016 BOLT, PIN 11 45132-166-016 BOOT, PIN BUSH (NISSIN) 12 45133-MA3-006 BOOT B 14 45203-MG3-016 PLUG, PIN 15 45215-ML7-922 PIN, HANGAR Some of these parts are available - some not so. One part that seems to be a little on the hard side to source is #10 (45131-166-016) a PIN BOLT that functions as one of the two major caliper slide pins. When I took the front calipers of EZ-RIDER apart, this bolt was in absolutely horrible shape:
Well, seeing as everything is closed in Hong Kong and I have a need for this part to be serviceable, I took it upon myself to try to refurbish this part of the front calipers, and see what could be done to bring it back into service.
Enjoy!
Help a Maker Out?
Did you see anything in this video you want for yourself? If the answer is yes, consider using one of the link(s) below to buy it directly from amazon.com. When you do, I get a small commission that keeps me going!
Bill of Materials
GLOVEWORKS HD Industrial Black Nitrile Gloves - 6 mil, Latex Free, Powder Free, Diamond Texture, Disposable, Large, GWBN46100-BX, Box of 100 https://amzn.to/35fifrv WD-40 Multi-Use Product Non-Aerosol Trigger Pro Spray. 20 oz. [1-Pack] https://amzn.to/30h2nmN
Mazbot 6" Cushion Comfort Foam Grip Beading Awl https://amzn.to/2ZjDwOL BLACK+DECKER RTX-6 2 Amp 3-Speed Rotary Tool https://amzn.to/2rHBJ9S Dry Wet Sandpaper by Heylure, 45PCS 9 x 3.6" Silicon Carbide, 120 to 5000 Grit Sandpaper Sheets Assortment, for Metal Sanding, Automotive Polishing, Wood Furniture, Wood Turning Finishing https://amzn.to/36AhUj5 Utopia Towels 12 Pack Dish Towels, 15 x 25 Inches Ultra Soft Cotton Dish Cloths, Blue
After three years of being abandoned in the bush and who knows how many years of neglect beforehand, the front calipers finally surrendered to disassembly! When it came to these calipers, everything that could have been rusty was rusty. If it was supposed to slide, it was seized. If it was subject to rot, then it was rotted. Everything that could have possibly been perished was perished. In short, they were a complete and total mess! After hours of puzzling over how to get them apart, they have finally come apart, but not without some concerns: - ALL of the rubber parts that composed these calipers were perished - Everything that could have possibly rusted was totally rusted. - Everything that was supposed to move was stuck fast. The three hardest parts of the disassembly were: 1) Initially getting the mounting arm off of the caliper body 2) Getting the hangar pin cover out 3) Getting the pistons out In all three cases, damage to the calipers was very possible - and in the case of the pistons it may be the case that they are damaged beyond the point of re-use. My intention is to sand them down and make them smooth again with #600 and #1000 grit sandpaper, so we shall see how that goes in a future video But for now, enjoy the video of how I got the front calipers apart, which was a triumph in and of itself.
Help a Maker Out?
Did you see anything in this video you want for yourself? If the answer is yes, consider using one of the link(s) below to buy it directly from amazon.com. When you do, I get a small commission that keeps me going!
Bill of Materials
Bondhus 22199 Hex L-wrench DoublePK,Long Length,12137 .050-3/8" & 12199 1.5-10mm https://amzn.to/2Ec80Zs WD-40 Multi-Use Product Non-Aerosol Trigger Pro Spray. 20 oz. [1-Pack] https://amzn.to/30h2nmN GLOVEWORKS HD Industrial Black Nitrile Gloves - 6 mil, Latex Free, Powder Free, Diamond Texture, Disposable, Large, GWBN46100-BX, Box of 100 https://amzn.to/35fifrv Felo 0715750274 1/2" Series 800 Slotted Screwdriver, 8" https://amzn.to/365QQYO Mazbot 6" Cushion Comfort Foam Grip Beading Awl https://amzn.to/2ZjDwOL 15 pieces Scratch Brush (Stainless Steel + Brass+Nylon), AFUNTA Curved Handle Masonry Wire brush Set Bristle for Cleaning Welding Slag and Rust,5 pcs Per Type https://amzn.to/2rvQFYK
And that's an understatement! In actual fact, I couldn't even get the brakes to move, much less come off at first, because the rusting brake pad parts had swelled up against the inside of the caliper housing to the point where they were well and truly stuck fast against the disk. I ended up levering the calipers off of the disk using a flat blade screwdriver, then my largest BONDHUS hex key, and then finally, a plank of wood! When I finally did get the calipers off, BOTH of the front brake pads split away from their backing pad and dropped immediately to the ground! It was much more dramatic firsthand than it looks on video, I assure you! Still...enjoy!
Help a Maker Out?
Did you see anything in this video you want for yourself? If the answer is yes, consider using one of the link(s) below to buy it directly from amazon.com. When you do, I get a small commission that keeps me going!