Brother
HL3170CDW "Print Unable 0A" Problem [Solved]
I bought a 2nd hand Brother HL3170CDW color printer the
other day on a local used goods website:

The printer was listed for a good price, and came with three
toner cartridges, so I jumped on the deal. But, while the machine arrived in great
cosmetic condition, it did have one major problem...it arrived DOA.
The First Sign of Trouble
Whenever I buy a used piece of equipment, I clean its
exterior and blow it out with my compressor before bringing it into the
house. While doing this, I noticed the Brother
HL3170CDW color printer cooling fan didn't make the characteristic whirring
sound that fans typically produce when compressed air is pushed through
them. They usually freewheel and make a loud
high-pitched whine with a rapidly increasing pitch. But in the case of the Brother HL3170CDW color
printer, the only sound I heard was a kind of dull click, despite several
attempts.
This Printer Was Definitely Troubled
After cleaning up the Brother HL3170CDW color printer and
bringing it inside, I plugged it in. The
machine powered up, but the only thing I got from it was the following error message
on the control panel:
Looking online, I discovered this error indicates a mechanical
failure of some kind.
No further
details were given. You are supposed to bring the machine into the dealer.
Into Troubleshooting Mode We Go
Springing into troubleshooting mode, I tried a bunch of the
typical things that help to isolate problems with printers.
1.
I re-seated all of the cartridges
2.
I re-seated the print tray
3.
I opened up all of the flip-out trays (manual
paper feeder, paper jam)
None of these measures worked.
How Laser Printers Start Up
Laser printers are actually examples of what would today be
called an Internet of Things (IoT) device, embedded system, single
board computer or even single-purpose computing device. All of these different names really just mean
that this machine is designed to satisfy a narrow list of requirements for
which it has been pre-configured.
Part of the pre-configuration for most special-purpose
devices is to perform something called a Power
On Self Test (POST). This is a small
routine that checks to make sure that the basic building blocks of the device
(CPU, RAM, NET, DEVICES) are available and sufficiently provisioned for the
device to achieve a known initial state. This is because devices like a Brother
HL3170CDW color printer act as a finite
state machine, and need a known initial state.
Knowing this, I started to think about the way that I would
design the POST for a modern device like the Brother HL3170CDW color
printer. If it were up to me, I would
check to make sure the following was available and working:
A.
The Central Processing Unit (CPU)
B.
The memory (RAM)
C.
The means of receiving print jobs (I/O)
D.
The means of moving paper though the machine
(DEVICE)
E.
The presence and proper availability of toner
(CONSUMABLE)
F.
The presence and proper availability of a fuser
to bond toner to paper (DEVICE)
But, due to my inkling of first signs of trouble, I felt I
needed to add one more device to this list.
The fan.
Fans and Computers
Fans have been a fact of life in computing for a long
time. They are a cheap and easy way to
keep computers cool. They have been
present in the power supplies of powerful Intel-based Personal Computers like
the IBM PC since the 80's and have been directly mounted to the top of the CPU
in most Personal Computers since the 90's.
People Hate Loud Fans
Originally, a "case fan" or "muffin fan"
was black, about 4 inches wide and it had two wires (red/black) leading out of it. Case fans also used to be simple - they ran at a constant
speed of around 2000 RPM. This could be kind of loud for some people, so in the old days we used to solder a 2W @ 100 Ohm resistor in series with one of the wires to quieten down the fan, by bringing down its RPMs to around 1000 RPM. Besides making it a lot more quiet, this also extended the life of the fan.
Fans are Smart Now
In response to these measures, "smart" fans started
to emerge about 20 years ago. You know your fan is "smart" if it has more than two wires coming out of it. Smart
fans can range from silent mode (0
RPM) to performance mode (~2200 RPM) completely through software and integration with a microcontroller. They control their speed by "slicing" the power coming into them at differing angles, a
technique known as Pulse Width
Modulation.
How to Troubleshoot a Fan
Suspecting that there might be something wrong with the fan
in the Brother HL3170CDW color printer, I shone a light into the fan outlet
area and plugged the printer in. What I
saw was the fan moving a little tiny bit, then stopping, then moving a little
bit, then stopping. It looked a lot like something was blocking the fan
So I unplugged the printer once again and got a thin piece of non-conducting
wood. I then used the piece of wood to manually move the fan blades to see if they would rotate through a full 360 degrees. They wouldn't, which confirmed my suspicions that they were being obstructed by something.
Disassembling a Brother HL3170CDW Color Printer
Thinking I was onto something, I undertook the challenge of disassembling the Brother HL3170CDW color printer. Taking one apart turned out to
be fairly easy. First, I unplugged
the unit. Next, I started removing obviously
related screws.
I quickly found out that there are just two screws involved; one is revealed by lifting the top deck of the printer. It is located at the front right corner. The other is behind the rear flip down cover, it is located at the rear top left corner as you look at the back of the printer.
The screws were the same size
and both had a Phillips head, so no special tools were required to remove
them.
Be very gentle here. Taking the plastic side panel off was a bit challenging
until I realized that I needed to gently depress some retaining clips
that are only accessible through little slots in the top right side of the
printer. I did this with a steak knife. I then had to navigate the two plastic
outrigger tabs off of little centering posts that also acted as screw mounts. Once the clips were disengaged, the cover easily
cantilevered off from the top to the bottom, more or less.
The D08K-24TS6 04B 8025 24V 0.14A axial cooling fan
With the right side panel removed, the cooling fan for the Brother
HL3170CDW color printer was revealed, so I examined it closely. It is a D08K-24TS6
04B 8025 24V 0.14A axial cooling fan with 3 wires coming out of it, which makes it a smart fan. Using my the non-conductive
piece of wood once again, I tried once again to rotate the fan blades through a
full 360 degrees, but they would still not turn smoothly. I then removed the fan unit entirely from the
printer by unplugging it and moving its three wires out of their retaining clip.
Powering Up a Fanless Brother HL3170CDW Color Printer
Powering up a fanless Brother HL3170CDW color printer was
unfruitful. It immediately gave a Print Unable 0A error.
Disassembling the D08K-24TS6
Having nothing to lose at this point, I decided to take
apart the D08K-24TS6 axial cooling fan to see what I could see, and maybe service it. Now, these four-inch fan units are not really designed
to be serviced, mostly because they are so cheap. But in the old days I used to have to take my
computer fans apart because replacement fans were so hard to find in my home
country in those pre-Internet times.
Besides,
99% of the time it is the bearings that go wrong in any fan, and you can get a lot
more life out of one by just cleaning the blades of dust buildup and putting a drop
of 3-in-1 oil in the bearings. This also goes for house fans, not just computer fans.
To take apart a typical "muffin" style fan you
usually have to follow these steps:
I.
Remove the fan from the computer
II.
Remove the label on the top of the fan
III.
Remove any retaining clips that are present
IV.
Orient the fan so the frame is pointing toward
you
V.
Using two thumbs, apply equal pressure to as
many blades of the fan as possible
VI.
The fan blade assembly should just pop off
fairly easily
VII.
If it doesn't, you are missing a retainer
somewhere
Fan Hacking
In the case of the D08K-24TS6, there was a significant (but
not infinite) amount of resistance at first, and then the fan assembly came
apart. As it turns out, the D08K-24TS6
features a "circlip free" retaining strategy that utilizes four posts with locking lobes to hold the fan together. The fan blade
assembly is rotated onto the four posts using special guide channels molded into the inside
of the fan blade assembly.
In the case
of this Brother HL3170CDW color printer, either the fan had never been assembled
correctly, or it had been somehow dislodged from its properly assembled state.
Whatever the case, the four posts were now blocking
D08K-24TS6 fan blade assembly, and preventing it from turning properly.
So I cut the four
posts off with a pair of small, sharp diagonal wire cutters.
The reason why I knew I could do this was simple. Fans are simple little motors that use basic
principles of magnetism to operate. They
feature a little permanent magnet that chases a rotating magnetic field that is
created by a set of carefully wound coils of copper wire. Even without the retaining posts, the
internal magnetic fields would be more than strong enough to keep the fan blade
assembly in place, especially considering the fact that this particular fan
resided in a molded enclosure. There was
literally nowhere for the fan blade assembly to go.
With the posts cut off, the fan blade assembly slid easily back
into place, and the fan was then able to rotate freely. Powering up the machine immediately resulted
in the sweet sound of the fan spinning up to maximum RPM, as well as the other sounds that laser printers tend to emit when they start up:
- Paper advance mechanism cycling
- Fuser relay clicking
- ...and so on
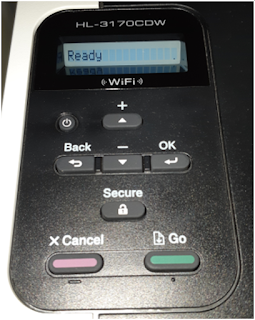
Sweet Success
Once the Brother HL3170CDW color printer had completed
its POST, I was presented with this screen:
Sources:
https://en.wikipedia.org/wiki/Computer_fan
https://en.wikipedia.org/wiki/Computer_cooling
https://en.wikipedia.org/wiki/Pulse-width_modulation
https://www.cnet.com/reviews/brother-hl-3170cdw-review