https://amzn.to/2zvPyvr
Showing posts with label appliance repair. Show all posts
Showing posts with label appliance repair. Show all posts
Wednesday, May 13, 2020
Ariston FBG IX Oven Element Replacement
Our Ariston FBG IX Oven was tripping the main breaker whenever we tried to use the electric grill, so we replaced the element. Here's how - and where to get the part...
https://amzn.to/2zvPyvr
https://amzn.to/2zvPyvr
Tuesday, May 12, 2020
Candy Range Hood LED Ugrade!
Bamboo House is a very strange place. There were all kinds of inexplicable problems when we moved in, especially with respect to the appliances in the kitchen.
For example the Range Hood, which is a high-quality brand (CANDY), had been installed, but the user manual had never been taken out of the assembly! Who knows how many years of service the fan underwent with a massive air blockage, but it was significant. The manual(s) were wrapped in plastic, which was covered in stale cooking oil. Once we removed the plastic covers, the manuals were in perfect condition. WEIRD.
The other thing that seemed strange was the light. It was yellow and very weak. I mean *really* weak. So, once I had figured out how to open and service the filters (which had never, ever been cleaned and which required a steel brush and turpentine to get even close to clean), the next step was to understand why the light was so dim.
As it turned out,. the light was dim because there was an ancient light bulb in there, and the frosted glass cover was coated with old, stale cooking oil! Once again, I had to break out the steel brush and turpentine, as well as steel wool!
Even stranger, the CANDY Range Hood was configured to take TWO light bulbs, even though it only had one installed. So I ordered a couple of replacement LED bulbs (9W) and this video shows what happens when you put pair of high-intensity white bulbs in where a single low-intensity yellow filament bulb had been before...
Friday, March 27, 2020
WINO the UNCOOL Wine Cooler (Part 1 to 6)
Some people leaving Hong Kong asked if anyone was interested in "rescuing" a broken wine cooler - how could I resist? WINO is an 18-bottle capacity Vinvautz wine cooler manufactured (of course) in China to the most widely applicable specifications possible. It's actually not a "Vinvautz". The unit is apparently a white label wine cooler that carries a number of badges (given they all share the same controller board). This includes Emerson, Midea and some other mid-tier brands that tend to purchase appliances that have reached commodity status.
Part 1
Part 2
Part 1
Part 2
Part 3
Part 4
Part 5
Part 6
Monday, March 23, 2020
Fixing WINO - The UNCOOL Wine Cooler!
The Story Of The Wine Cooler That Didn't Cool
Failing capacitors are often at the heart of power supply failure, so that should be the first components to look at when a device stops working properly. In my case, the failing device was WINO - a Vinvautz 18 Bottle Wine Cooler. It apparently stopped working one day, and the original owners just didn't have the time or opportunity to go about fixing it.
When I picked WINO up, it was already disassembled. The power/logic board had already been removed.
The replacement filtering capacitors weren't expensive at RMB1.50 each, so I got ones that were rated for the same heat environment (CD288H @ 105C) and a higher voltage (400v). In total, five replacement capacitors cost about USD1.00.

The capacitor replacement, while probably a good idea, didn't solve the problem, so I needed to go downstream from there.
Looking at the board
This particular one looked like it had been serviced somehow:


The next component to take a look at is the STPS2045CTC, which is a pair of Shottky diodes in a TO-220 style transistor package
Dual center tap Schottky rectifier suited for SwitchMode Power Supply and high frequency to DC converters. Packaged either in TO-220AB, I²PAK, or D2PAK, this device is especially intended for use in low voltage, high frequency inverters, free wheeling and polarity protection applications.
Looking on the other side of the board, I discovered that it was a Schottky diode pair (STPS2045CTC) in a TO-200 transistor package.

Converting from AC to DC is simple when using a Schottky diode STPS2045CT rectifier from STMicroelectronics. Its peak non-repetitive surge current is 180 A, while its maximum continuous forward current is 20 A. It is made in a dual common cathode configuration. This rectifier has an operating temperature range of -65 °C to 175 °C.
Here's what a common cathode configuration looks like, electronically speaking:

UPDATE:
After replacing the STPS2045CTC with a replacement unit, the problem persisted. If the machine has been turned off for a long time, you get a buzzing sound and the LED lights flicker. Turn the machine off and then back on again, and you get nothing - dead machine - unless you wait a while.
Strangely, the machine boots when the high-current connector to the cooling system is unplugged, indicating a problem of some kind with that system along - by that I mean that the interface boots and the fans activate.
Even stranger than that, if you turn the machine on with the pelletier circuit disconnected, then connect it after the machine is up and running, the machine works fine!
- Replace Power/Logic Board = RMB150 / USD20.00
- Introduce 12v Timer Delay Board = RMB16 / USD2.00
Which is cheaper and more fun? Why the 12v Delay Timer Board of course!
ENTER The 12v Delay Timer Board
Another way to get WINO working is to simply work around its power supply problem with a timer delay board that defers the activation of the pelletier cooling circuit until all of the other systems are in place.
(similar to stereo delay timers)
Here's the board I decided to use:

Here's how you wire it in:

REFERENCES
https://www.youtube.com/watch?v=KBhVS7GhCOM
Saturday, March 14, 2020
Bamboo House - Retrofitting a Dishwasher (Part 1 to 7 + Follow Up)

Putting A Dishwasher Where There Was None Before

Bamboo House came with a major omission - no dishwasher! Horrors!
There are a few things in a marriage that are non-negotiable. Not having a dishwasher is one of ours. Mrs. Maker places very few non-negotiable demands on me, and washing dishes is one of them.
So, when we relocated to Bamboo House, I had to figure out a way to put in a dishwasher where there was none before. In fact, the kitchen of Bamboo House was really deficient for anyone but a confirmed bachelor surviving on a diet of all-day-breakfast, sandwiches, coffee, canned food, pizza and Kraft Dinner...and now you know the extent of my diet before I met Mrs. Maker!
The only logical place to put a dishwasher was where a half-fridge alcove had been constructed into the galley-style kitchen of Bamboo House. Not ideal, but really the only place where such an appliance could even conceivably be positioned.
Three small problems: (1) A non-standard niche; (2) No water supply; and (3) No drain!
Once we managed to find an unusually narrow dishwasher that fit the niche reasonably well (with 1cm to spare on both sides) I still needed to launch a fairly serious retrofit project to put in the utilities necessary to make the dishwasher more than a glorified dish storage cupboard.
This series of videos documents the entire process I followed, including a set of false leads that forced me to backtrack, pause, ponder, regroup and re-attack the original problem(s) I thought I had solved (but actually failed to solve) along different lines.
Here's the entire series, with no steps skipped.
It took a few tries to get everything just right, so you may want to watch all of the videos in the series before attempting to duplicate my results.
Part 1
Part 2 In this segment of the dishwasher retrofit story, I get into the actual plumbing of this 45-year-old house. Working with older, brittle plumbing turned out to be non-trivial, and there was a nasty surprise in store for me..
Part 3 In this segment, I recover the plumbing from having shattered, leaving next to nothing behind to work with and jeopardizing the entire project. Happily, after a lot of HACKERY, I was able to put the project in a position where it had a chance of successful completion - but not a sure thing by any stretch...
Part 4
Part 5
Part 6
Part 7
Follow Up
Help a Maker Out?
Did you see anything in this video you want for yourself? If the answer is yes, consider using one of the link(s) below to buy it directly from amazon.com. When you do, I get a small commission that keeps me going!
Bill of Materials
GLOVEWORKS HD Industrial Black Nitrile Gloves - 6 mil, Latex Free, Powder Free, Diamond Texture, Disposable, Large, GWBN46100-BX, Box of 100
https://amzn.to/35fifrv
Dry Wet Sandpaper by Heylure, 45PCS 9 x 3.6" Silicon Carbide, 120 to 5000 Grit Sandpaper Sheets Assortment, for Metal Sanding, Automotive Polishing, Wood Furniture, Wood Turning Finishing
https://amzn.to/36AhUj5
Utopia Towels 12 Pack Dish Towels, 15 x 25 Inches Ultra Soft Cotton Dish Cloths, Blue
https://amzn.to/34rdwC1
Best Value 24-Piece Master Combination Wrench Set with Roll-up Storage Pouch | SAE 1/4” to 1”
https://amzn.to/2GyIU87
WORKPRO 4-piece Adjustable Wrench Set, Forged, Heat Treated, Chrome-plated (6-inch, 8-inch, 10-inch, 12-inch)
https://amzn.to/31765zV
Channellock 440 Tongue and Groove Pliers | 12-Inch Straight Jaw Groove Joint Plier with Comfort Grips | 2.25-Inch Jaw Capacity | Laser Heat-Treated 90° Teeth| Forged High Carbon Steel | Made in USA
https://amzn.to/2RBw7YQ
DEWALT 20V MAX Cordless Drill Combo Kit, 2-Tool (DCK240C2)
https://amzn.to/2vGXk3Y
Hole Saw Kit, JELLAS 19Pcs Upgraded Hole Drill Cutter Set in Hard Box, 2 Mandrels, 1 Installation Plate, 1 Hex Key, Durable and Cut Precise Holes for Soft Wood, Drywall, PVC Board and Plastic
https://amzn.to/33ciC5Z
Komelon SM5425 Speed Mark Gripper Acrylic Coated Steel Blade Measuring Tape, 1-Inch X 25Ft , White
https://amzn.to/35N4ZLe
Thursday, April 4, 2013
TEFAL 8143 Hand Mixer / Blender Redux
Hello,
This is PART II of my hand mixer repair saga.
For some context, you may want to have a look at PART 1 first.
So I went off to the electronics store recently to buy parts to build a pair of Voltage Buffered Oscilloscope Probes for a Free Sound Card Based Oscilloscope I'm working on and a One Dollar i2c programmer I'm interested in building to help overcome the EEPROM based Power On Password and Supervisor Password protection of the IBM T30 and other IBM T-Series laptops.
While there, I picked up a THERMAL FUSE (SEFUSE) that is rated for a slightly higher temperature cutoff (130 degrees) than the original SEFUSE (113 degrees) installed in the TEFAL 8143 Hand Mixer.
Opening up the TEFAL 8243 Hand Mixer, here's what I saw:

The SEFUSE is soldered in line at the winding entry point, wrapped in a non-conducting material (a piece of the old chamois wash cloth left over from me setting up a soldering tip sponge in my soldering station) secured by a couple of tie-wraps, then tucked below the motor for safe-keeping:

Here's the unit I built. Slightly over-engineered, what?

As you can see, the gauge of the winding wires (seen against a white paper background for contrast) is something like #30. Really thin. Also enamel or varnish coated. A pain to solder.

Another quick view of the wiring in this puppy from a slightly further back perspective.

A selection of different types of fuse
The top is a standard BSA type fuse we find in the PLUGS here in Hong Kong. I never saw a fused plug before I got here, but in a way it makes sense. It also makes for HUGE PLUGS.
The middle fuse is the one that's going to go into this TEFAL 8143 Hand Mixer, rated for about the same current (10A) but about 10 degrees hotter than the one that blew. This is a dual-mode fuse, it will blow if too much CURRENT is drawn or if too much HEAT is generated.
The bottom is also an SEFUSE, but it's just been packaged in an IC format, probably for convenience when mounting on a circuit board. It's rated for a lower current but about the same temperature. These things are probably everywhere.

The new SEFUSE placed where it will eventually permanently reside.

I think I'll put it in the center of the mechanism. The plastic housing is domed and it just looks nicer.

Soldered in, taped down and ready to go. All that remains is to put it back together.
Now, much safer.
Done.
Sunday, February 24, 2013
Tefal 8143 Hand Mixer / Blender Fix
Scenario:
When making pizza dough one day (on the slowest setting) our TEFAL 8143 mixer just stopped working.
The blender is a TEFAL 8143 bundled with a few accessories, (whisk blades, dough knead blades, bowl).
One of the blades has a little plastic gearing integrated with it that mates to a plastic bowl, making it turn Both of these then fit into a large plastic assembly that puts everything together. When operating properly the blender blends and the bowl spins without the need for the user to hold them together.

First Link:
Doubt the supply of electricity from the panel.
In my case, I got glowing wires, so I moved to the next link of the troubleshooting chain.
Second Link:
Seeing as it was a British style plug (they are large, 3-pronged and have a fuse in them):

In my case, I got zero resistance. Yaay!
Put plug back together and optimistically plug in mixer / blender.
Nothing. Sigh.
Third Link:
Getting complicated now. We've eliminated everywhere else the problem could have happened but for inside the blender itself. It's time to think about opening up the blender / mixer and start messing with internals.
HUH? Funny little screws here - two are normal "star" or Phillips head, two are NOT. They look like a colon : has been pressed into the top of the screw head (I am to find out later these are called "M" type screws, and are used when the manufacturer does not want the consumer to open the appliance, typically because there are "no user serviceable parts inside").
Phillips screw head

M type screw head

I don't have this screwdriver.
Work comes to a complete halt.
Fourth Link:
Call TEFAL and ask what can be done about this situation.
They say there's an HKD80 / USD10 dollar charge to just accept the unit for inspection.
Moreover, any other parts are extra
This entire process could take up to a week
SIMPLY INTOLERABLE!
THAT'S MONEY THAT COULD GO TO BUYING IMPORTANT STUFF...LIKE TOOLS! :)
The appliance costs about HKD500 / USD62.00 new.
The repair charge could easily come up to HKD200 / USD25.00
That's about 40% of the cost of just buying a new one (which would come with a warranty).
Fifth Link:
Off to local electronics mecca (Ap Liu Street).
Poked around for about two hours.
Found an "M" size screwdriver that fits the screw in the mixer / blender for HKD13 / USD1.75.

Bought "helping hands" soldering station for HKD40 / US5.00.
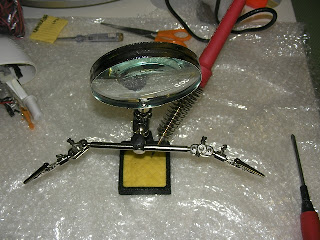
Also bought a bunch of unrelated goodies for other, upcoming projects and to goof around the house with (de-soldering pump, banana plugs, jigsaw blades, tweezers, and so forth).
Sixth Link:
Returned home.
Showed new tools to wife for obligatory appreciative noises (wives are just great!)
Proceeded to opening up TEFAL blender / mixer 8143
Got the FLUKE multimeter on the case:
Puzzlement and perplexity! Power is making it ALL THE WAY to the motor windings, which is a 50/60HZ 220VAC rated unit. Personally I was pretty sure that the problem was going to be early in the power distribution / supply in this unit. I was thinking along the lines of maybe a bad rectifier diode (blown open) or a blown up capacitor.
There's nothing much in this appliance aside from the motor and a rotary type control switch.. Just a few assorted resistors and little ceramic caps (all of which looked fine). Due to the design of the motor, there ISN'T a rectifier circuit. WTF? Uh-oh. Looks like maybe something even more worst-case happened...like we blew one of those little fine wires in the stator of the motor.
Maybe there's a short circuit somewhere in there? The motor assembly is replete with LOTS of little, hair-thin wires, most of which are linked to the six-position switch that introduces 220V into different stages of the stator winding, which probably serves to give it a multi-speed capability, maybe with a resister network somewhere to drop the AC. But a short would just make the switch irrelevant and the motor not change speed...not utterly kill the unit...unless the wires melted when they shorted.
Stator built like a normal transformer, stamped metal layers stacked together and then wound with ultra fine (22 gauge or higher) unshielded wire.
Nothing special there.

Guess it's time to flick the Fluke multi-meter over to resistance and start looking for where the broken lead might be. God, I hope it's not in the center of the winding.
Unplug unit and start probing...
Windings all look OK, but there's something weird about the first one after the power entry. Doing all of these tests in-circuit can be tricky because current from the meter flows all over the place and can give weird results rather than testing discrete components. Hmmm. Well, how about removing the tape around the center of the rotor (the above shows the tape already removed) to get a better idea of where these little hair-thin wires are going?
AHA! Under TWO layers of paper lurks what looks suspiciously like a diode!

Silver can type and completely camouflaged from view....let's have a closer look.

Well, well, well.. It's not a diode. It's a FUSE!
And guess what? Infinite resistance. Watson, I think we've found our man!
But WHY is this fuse located in the (literally) last place someone would look for it? Does it it also have a thermal cutoff feature in case the motor gets too hot?
[ed: As it turns out...yes]
Pull out soldering iron. Now you know why I bought that soldering station, to unsolder two leads... :)

Assemble a new fuse holder from a couple of extra, broken British style plugs bouncing around in the parts bin and some speaker wire. My choices for fuses to put in the holder are 3A, 5A and 13A so I go for the highest value.

Wrap the new assembly in insulating material secured by tie wraps (just in case, for anti-vibration) and tuck the entire thing into cavity found in blender / mixer body. Pigtail, then solder leads. Insulate everything in sight from each other with white electrical tape.

Re-assemble unit with Phillips and "M" style screwdrivers.
Test.
Works
Gonna go make oatmeal cookies now... :)
http://allrecipes.com/recipe/soft-oatmeal-cookies

AFTERWORD: I have since determined that the FUSE that was in my unit was an SEFUSE (Thermal Fuse) designed to cut out at 113 degrees centigrade. Apparently the motor in this unit runs pretty HOT (ergo, the little integrated plastic fan off of the end of the rotor).
Well, the 13A fuse I put into the unit is NEVER going to blow due to too much current being pulled by the motor (the plug fuse is only 3A), and it will *never* blow due to heat, so I think I'll just open up this little mixer and put a 3A fuse (or lower) in there some day. The fuse in the plug is rated at 3A. Also, I think that we'll stay away from lower RPM settings when mixing thick stuff as the current draw is probably the reason why the motor heated up causing the fuse to blow. OR, I'll put in a thermal cutoff that actually resets once it cools, instead of the one shot wonder that TEFAL put in there. A fuse costs about USD0.50, a thermal cutout about USD1.50.
I wonder how much "service call revenue" (and landfill) this dollar difference has caused over the years...
UPDATE: After thinking about it a little bit, I have decided that the thermal cutout protection is the real reason why that fuse was where it was, not the current protection (after all the plug fuse is 3A). So I will be pulling out my "industrial strength" hand made fuse and putting in the little tin can fuse.
FINAL: I replaced the fuse with another, slightly higher temperature rated unit. Read all about it at TEFAL 8143 Hand Mixer / Blender Redux
When making pizza dough one day (on the slowest setting) our TEFAL 8143 mixer just stopped working.
The blender is a TEFAL 8143 bundled with a few accessories, (whisk blades, dough knead blades, bowl).
One of the blades has a little plastic gearing integrated with it that mates to a plastic bowl, making it turn Both of these then fit into a large plastic assembly that puts everything together. When operating properly the blender blends and the bowl spins without the need for the user to hold them together.

Problem was, it stopped spinning
First Link:
Doubt the supply of electricity from the panel.
- Test socket with another appliance (like a toaster).
- Wires glowing red inside the toaster = power OK.
- No glowing red wires inside the toaster = check the breaker.
In my case, I got glowing wires, so I moved to the next link of the troubleshooting chain.
Second Link:
Seeing as it was a British style plug (they are large, 3-pronged and have a fuse in them):

- Disassemble plug
- Test fuse with my FLUKE multimeter.
- Zero resistance = fuse OK.
- Infinite resistance (OL) = fuse blown.
In my case, I got zero resistance. Yaay!
Put plug back together and optimistically plug in mixer / blender.
Nothing. Sigh.
Third Link:
Getting complicated now. We've eliminated everywhere else the problem could have happened but for inside the blender itself. It's time to think about opening up the blender / mixer and start messing with internals.
HUH? Funny little screws here - two are normal "star" or Phillips head, two are NOT. They look like a colon : has been pressed into the top of the screw head (I am to find out later these are called "M" type screws, and are used when the manufacturer does not want the consumer to open the appliance, typically because there are "no user serviceable parts inside").
Phillips screw head
M type screw head
I don't have this screwdriver.
Work comes to a complete halt.
Fourth Link:
Call TEFAL and ask what can be done about this situation.
They say there's an HKD80 / USD10 dollar charge to just accept the unit for inspection.
Moreover, any other parts are extra
This entire process could take up to a week
SIMPLY INTOLERABLE!
THAT'S MONEY THAT COULD GO TO BUYING IMPORTANT STUFF...LIKE TOOLS! :)
The appliance costs about HKD500 / USD62.00 new.
The repair charge could easily come up to HKD200 / USD25.00
That's about 40% of the cost of just buying a new one (which would come with a warranty).
Fifth Link:
Off to local electronics mecca (Ap Liu Street).
Poked around for about two hours.
Found an "M" size screwdriver that fits the screw in the mixer / blender for HKD13 / USD1.75.

Bought "helping hands" soldering station for HKD40 / US5.00.

Also bought a bunch of unrelated goodies for other, upcoming projects and to goof around the house with (de-soldering pump, banana plugs, jigsaw blades, tweezers, and so forth).
- Resisted temptation to buy a regulated power supply.
- Resisted temptation to buy an oscilloscope.
- Actually succeeded.in my resistance :)
Sixth Link:
Returned home.
Showed new tools to wife for obligatory appreciative noises (wives are just great!)
Proceeded to opening up TEFAL blender / mixer 8143
Got the FLUKE multimeter on the case:
- Trace path of 220VAC to see how far along the power was making it into the unit
- Took note of anxious noises from wife who is alarmedly watching me poking metal probes into an opened up, plugged in blender.
- Sincerely promise that I will be very careful to avoid electrocution.
- Am even more careful from then on. Left hand in pocket.
Puzzlement and perplexity! Power is making it ALL THE WAY to the motor windings, which is a 50/60HZ 220VAC rated unit. Personally I was pretty sure that the problem was going to be early in the power distribution / supply in this unit. I was thinking along the lines of maybe a bad rectifier diode (blown open) or a blown up capacitor.
There's nothing much in this appliance aside from the motor and a rotary type control switch.. Just a few assorted resistors and little ceramic caps (all of which looked fine). Due to the design of the motor, there ISN'T a rectifier circuit. WTF? Uh-oh. Looks like maybe something even more worst-case happened...like we blew one of those little fine wires in the stator of the motor.
- Unplug unit.
- Try to turn the gears inside the unit by hand.
- No problem, so it's not jammed.
Maybe there's a short circuit somewhere in there? The motor assembly is replete with LOTS of little, hair-thin wires, most of which are linked to the six-position switch that introduces 220V into different stages of the stator winding, which probably serves to give it a multi-speed capability, maybe with a resister network somewhere to drop the AC. But a short would just make the switch irrelevant and the motor not change speed...not utterly kill the unit...unless the wires melted when they shorted.
Stator built like a normal transformer, stamped metal layers stacked together and then wound with ultra fine (22 gauge or higher) unshielded wire.
Nothing special there.

Guess it's time to flick the Fluke multi-meter over to resistance and start looking for where the broken lead might be. God, I hope it's not in the center of the winding.
Unplug unit and start probing...
Windings all look OK, but there's something weird about the first one after the power entry. Doing all of these tests in-circuit can be tricky because current from the meter flows all over the place and can give weird results rather than testing discrete components. Hmmm. Well, how about removing the tape around the center of the rotor (the above shows the tape already removed) to get a better idea of where these little hair-thin wires are going?
AHA! Under TWO layers of paper lurks what looks suspiciously like a diode!

Silver can type and completely camouflaged from view....let's have a closer look.

Well, well, well.. It's not a diode. It's a FUSE!
And guess what? Infinite resistance. Watson, I think we've found our man!
But WHY is this fuse located in the (literally) last place someone would look for it? Does it it also have a thermal cutoff feature in case the motor gets too hot?
[ed: As it turns out...yes]
Pull out soldering iron. Now you know why I bought that soldering station, to unsolder two leads... :)
- Remove fuse from circuit.
- Test as discrete component.
- We still have infinite resistance, the fuse is truly blown.
Wow. This is a 10A fuse at 220V. That's a LOT of juice.
Assemble a new fuse holder from a couple of extra, broken British style plugs bouncing around in the parts bin and some speaker wire. My choices for fuses to put in the holder are 3A, 5A and 13A so I go for the highest value.

Wrap the new assembly in insulating material secured by tie wraps (just in case, for anti-vibration) and tuck the entire thing into cavity found in blender / mixer body. Pigtail, then solder leads. Insulate everything in sight from each other with white electrical tape.

Re-assemble unit with Phillips and "M" style screwdrivers.
Test.
Works
Gonna go make oatmeal cookies now... :)
http://allrecipes.com/recipe/soft-oatmeal-cookies

AFTERWORD: I have since determined that the FUSE that was in my unit was an SEFUSE (Thermal Fuse) designed to cut out at 113 degrees centigrade. Apparently the motor in this unit runs pretty HOT (ergo, the little integrated plastic fan off of the end of the rotor).
Well, the 13A fuse I put into the unit is NEVER going to blow due to too much current being pulled by the motor (the plug fuse is only 3A), and it will *never* blow due to heat, so I think I'll just open up this little mixer and put a 3A fuse (or lower) in there some day. The fuse in the plug is rated at 3A. Also, I think that we'll stay away from lower RPM settings when mixing thick stuff as the current draw is probably the reason why the motor heated up causing the fuse to blow. OR, I'll put in a thermal cutoff that actually resets once it cools, instead of the one shot wonder that TEFAL put in there. A fuse costs about USD0.50, a thermal cutout about USD1.50.
I wonder how much "service call revenue" (and landfill) this dollar difference has caused over the years...
UPDATE: After thinking about it a little bit, I have decided that the thermal cutout protection is the real reason why that fuse was where it was, not the current protection (after all the plug fuse is 3A). So I will be pulling out my "industrial strength" hand made fuse and putting in the little tin can fuse.
FINAL: I replaced the fuse with another, slightly higher temperature rated unit. Read all about it at TEFAL 8143 Hand Mixer / Blender Redux
Subscribe to:
Posts (Atom)