
Did I Give An Old Computer A New Lease on Life? Yes! But It Wasn't Easy...
A Gift That Kept on Taking?
About a year ago, my next door neighbor gave me a "broken" iMac as a result of a casual conversation. I was talking about how I liked to relax by solving knotty technology problems. He said "I have one for you!" and the next day handed over a 24" White iMac. As he gave it to me, he mentioned that it just stopped working one day. Since then, I have been trying, off and on, to get it working. This is the story of me and sentinel.My iMac Ignorance
I have to admit that I don't know much about iMac computers. The earliest Apple product I worked on was an Apple II+ in the late 1970's. That's what hooked me on computers in the first place. The last Apple Macintosh I worked on regularly was a Mac IICI, back in my Undergradate days, in the early 1990's. Around the year 2000, I bought a few G3 iMac computers for the designers at my company. A couple of years later, I upgraded the design team to Power Mac G4 computers and around the year 2005, I upgrading them once more to Power Mac G5 computers. The designers loved each upgrade, and loved their machines. Since then, I have not used Apple technology, so I really didn't know anything about them, or their development, for the last 10 years or so. That's the extent of my familiarity with Apple hardware, aside from casual contact with other people's machines.
My iMac Factory Sticker
Performing basic technology triage, I discovered a factory installed sticker on the bottom of the base of the machine. It contained a lot of useful information:

The Factory Sticker Decoded:
Here's what I could glean from the factory sticker coding:
- 24 Inch Display
- 2.33Mhz CPU
- 2Gb RAM
- 256Mb Video RAM
- 500Gb HDD
- Superdrive
- International Keyboard
Finally, it seems that the machine is of a specific type for this model:
- 2111 (Machine Type)
My iMac Described
After figuring out what model of iMac I had been given, I was able to research it.
According to EveryMac.com, my iMac dates from 2006:

http://www.everymac.com/systems/apple/imac/specs/imac-core-2-duo-2.16-24-inch-specs.html
Here's a mini system specification:

http://www.everymac.com/ultimate-mac-lookup/?search_keywords=2111
The Differences in the White iMac Core2Duo Family
Curious, I also looked into the different iMac computers offered in this product family:

http://www.everymac.com/systems/apple/imac/faq_cd/differences-between-imac-core-2-duo-models.html
Very Strange Behaviour
From the outset, my White iMac 24" Core 2 Duo 2.33 behaved very strangely. After sourcing a power cord, USB hub, keyboard and mouse from my inventory of spare parts, I plugged everything in and turned it on. Encouragingly, I was greeted with the familiar Apple "chime" sound.
But my joy was short-lived. My White iMac 24" Core 2 Duo 2.33 didn't boot. Instead, I was greeted with a "question mark folder" indicating that it could not find a boot device:

iMac Computers are Very, Very Difficult to Open
Puzzled, I decided to open my White iMac 24" Core2Duo 2.33 up and take a look inside. This turned out to be a much more difficult task that I was used to. I normally work with PC computers. For me, opening a PC usually involves removing a couple of screws, or (when it comes to my DELL Precision 490) simply moving a lever.
Not so with this iMac. First of all, there was no obvious way to get it open. The only screws I could find anywhere on the case were arrayed along the bottom of the body of the machine. To boot, they were a mixed bag of Phillips "cross" type screws and TORX "star" type screws. I quickly found out that the Phillips screws, located in the middle of the case, were for the RAM cover. The TORX screws were another story. They looked like they were securing the plastic case to the metal frame (Note: TORX screws usually mean "stay out" for most consumer oriented products).
It was at that point that I decided to name this machine sentinel after the enigmatic and eponymous object featured in a 1948 short story by Arthur C. Clarke, "The Sentinel". Much expanded, that story later became a 1968 ground-breaking book by Arthur C. Clarke called 2001: A Space Odyssey. The book inspired a film that came out that same year: 2001: A Space Odyssey by Stanley Kubrik. Both are iconic.
As soon as I was able to get the RAM chips out, I took a photo of them:

These are 2Gb SIMMS, meaning (potentially) that sentinel had a maximum of 4Gb of RAM available. Sadly, I found out later that this model of iMac can only address 3Gb of RAM.
I Finally Managed To Get sentinel Apart
Despite my unfamiliarity with how iMac computers are put together, I forged on ahead. I happen to have a full set of TORX screwdrivers, so that posed no obstacle. Helpfully, I found a great video showing how to take a White iMac apart starring Rebecca K of Small Dog Electronics (www.smalldog.com). Rebecca made it look easy, and I was able to follow her steps to get sentinel apart. The only difference between what happened in her video and my own experience was the number of screws involved (I had six, she had three) and the location of one of the video cables. Aside from that, my experience more or less mirrored hers. I found the video very useful. Thank you Rebecca!
sentinel Had a Missing Hard Disk Drive
Inside sentinel, I found a surprise - and in a way, no surprise at all. The Hard Disk Drive was missing. But someone had been thoughtful. The mounting screws had been placed in a ziploc bag and taped to where the hard disk once resided.

I must say, the bag of hard drive mounting hardware was very neatly placed:

Putting a Replacement Hard Disk Drive in sentinel
Once again, I turned to my inventory of spare parts. I hit upon an old Hard Disk Drive that was probably compatible with sentinel, a Seagate Barracuda 7200.10, a 500Gb SATA disk:

I installed the drive and within minutes, sentinel was ready to go! But go where? I had nothing to install, because sentinel had arrived without any install media.
FAIL: Using A MAC OSX Install Media
I decided to buy an aftermarket copy of the OSX install media to get sentinel up and running. According to the MacSales.com website, the latest compatible version of OSX for sentinel was Lion (OSX 10.7.x):

So I went ahead and bought a copy of the Lion MacOS install DVD. I have to admit I was a little reluctant in doing so, for a couple of reasons. First of all, I wasn't that familiar with OSX. Second, the Lion version of OSX, while still supported by Apple, is getting a little old. What I really wanted was to install some version of Linux on sentinel, because I am much more familiar with that operating system. Anyway, I bought the install media from a local online purveyor of MacOS install media for the equivalent of $15.00:

But the OSX install media I received didn't work.
At first I got this "spinning wheel" screen, which was very encouraging, especially since the DVD drive was also chattering away...

...but after quite a while, I got this screen, which was not encouraging at all...

As many times as I tried to use it, all I ever got from the Lion install media I bought was the dreaded white screen of death. Bummer.
(Perhaps I should have bought Leopard (OSX 10.5.6) because that version of the OSX apparently comes with better Hard Disk Drive setup support. Another factor in its favour is that Leopard is more contemporaneous with sentinel.)
Regardless, the bottom line for me was that sentinel could not even boot a supposedly native MacOS OSX install DVD. At that point, I totally ditched the notion of installing any version of OSX on sentinel, and forged ahead with my preferred path, installing Linux.
USELESS SUCCESS: rEFInd
While I was casting about for a way to get sentinel to boot *any* operating system, I burmed through a lot of DVD-ROM discs. I decided to stop doing this and instead use USB based devices (thumbdrive, portable disk drive) to perform my tests. A byproduct of that effort was that I discovered that I could get sentinel to boot into a kind of operating environment.
This is what using the rEFInd bootable DVD got me to:

From this screen, I was able to drop to the rEFInd command prompt, which resembles the operating environment of Linux, or some other flavor of *nix.

Within the rEFInd command line operating environment, I was able to do pretty much anything I wanted (within its very tight limits). This proved to me that sentinel was functioning OK on a hardware level, which was great to know. Unfortunately, the rEFInd operating environment wasn't very useful as a general operating environment. It's a specialized operating environment for managing boot devices.
Enter Linux
The decision to install Linux on sentinel turned out to be a mixed blessing. Initially, it was a source of considerable frustration, mostly because the dizzying array of distributions I downloaded and burned to DVD-ROM simply didn't work.
The Gang of FAIL: Linux Distros That Didn't Work on sentinel
The following distributions did not work on sentinel, they all resulted in the dreaded black screen of death.
- Debian (netboot)
- Slackware
- TinyCore
- Puppy
- Mint
- LXLV
- Ubuntu (Trusty Tahir) - standard, alternative, net install
- Ubuntu (Xenial Xerus) - standard, alternative, net install
- Ubuntu (Mitaka) - standard, alternative, net install
- CentOS 7
As It Turns Out, Sentinel Has a Video Card With "Issues"
The big problem with booting Linux on sentinel has to do with its video card. With almost every Linux distribution I used, whatever video mode the installer program they used appeared to go into a mode that was incompatible with the NVIDIA video card in sentinel. This either froze sentinel completely, or made it impossible to operate. Naturally, the Linux installation process was made very frustrating by all of this. There's a lot of online discussion about problems with NVIDIA video cards under Linux, and and how difficult the company is to deal with and develop Linux video card drivers for.
As a backgrounder, the video card in sentinel is one of these two:
1) An NVIDIA GeForce 7300GT graphics processor with 128 MB of GDDR3 SDRAM using PCI Express.*
or
2) An NVIDIA GeForce 7600GT graphics processor with 256 MB of GDDR3 SDRAM using PCI Express.
* The NVIDIA 7300GT was the default card when the machine was released, the 7600GT was made available at the time as an optional upgrade for US$125.
Here's how I figured out what video card was in sentinel:
root@sentinel:/etc/rc2.d# lspci | grep "VGA"
01:00.0 VGA controller: NVIDIA Corporation G73 [GeForce 7600 GT] (rev a1)
UTTER FAILURE: USB Boot
During this project, I found out something else: Older iMac computers, like sentinel, cannot boot from USB. It's basically impossible. After I got the computer to boot from the rEFInd DVD, one of the things that rEFInd enables is the opportunity to boot from alternate storage, like external USB devices. Very excitedly, I went for it. Unfortunately, restrictive firmware made things impossible. I always got an error screen, regardless of what type of USB device (thumbdrive, hard disk drive) I tried.
I tried out a thumb drive called PENDRIVE:

...which was detected by rEFInd...

but here's what I got for my trouble:

I then tried to use an external USB Hard Disk Drive...

...which once again was detected by rEFInd...

...but I once again got this for my trouble...

Unfortunately, neither USB device worked, due to the limitations of older iMac firmware, or ignorance on my part in terms of properly preparing these storage devices for recognition by the iMac firmware. It seems that you need an iMac to boot an iMac. Well, I don't have two, I have one - and it's broken.
"QUALIFIED" SUCCESS: Certain Ubuntu Linux Distributions
sentinel and Ubuntu Linux - A Story of Confusion
Eventually, I figured out that sentinel could boot certain "underground" versions of Ubuntu. Take note, these versions are unsupported by Canonical, because they were specially modified for the iMac. The versions that worked for me were Precise Pangolin & Trusty Tahir, and they were only available from deep within the guts of the Ubuntu download environment. After downloading them and burning them to DVD-ROM (sigh), I was able to boot them both. Here's some details about them:
- Precise Pangolin (Ubuntu 12.04.5 LTS + "iMac support")
- Trusty Tahir (Ubuntu 14.04.5 LTS + "iMac support")
- Precise Pangolin ships with Linux kernel 3.2
- Precise Pangolin is scheduled to reach End of Life in April 2017
- Trusty Tahir ships with Linux kernel version 3.13
- Trusty Tahir is scheduled to reach End of Live by April 2019
Booting Trusty Tahir + "iMac support" Version
While I tested both Precise Pangolin and Trusty Tahir on sentinel, and decided to go with Trusty Tahir. A big factor in that decision was the fact that Precise Pangolin is slated for end of life by April 2017, which is next month! After that point, it will no longer be supported for free by the manufacturer, Canonical.On the other hand, Trusty Tahir is not slated for end of life until April 2019:

Where to Find iMac Friendly Trendy Tahir
iMac friendly versions of both Precise Pangolin and Trusty Tahir can be downloaded directly from the Ubuntu download environment, which is located at http://mirror.pnl.gov/releases/
For the impatient, here's the fully qualified path to the Trusty Tahir Mac ISO that worked for me:
http://cdimage.ubuntu.com/releases/14.04/release/ubuntu-14.04.5-server-amd64+mac.iso
Once the web page opens, click on Unsupported Ubuntu Images:

http://mirror.pnl.gov/releases/
Next, click on the 14.04.5 folder:

http://cdimage.ubuntu.com/releases/
Next click on the release folder:

http://cdimage.ubuntu.com/releases/14.04.5/
Next, click on ubuntu-14.04.5-server-amd64+mac.iso to download the file:

Finally, burn the ISO to a DVD.
I used CDBurnerXP under Windows 7 to do that, it worked great.
Booting Trusty Tahir on sentinel:
Here's what I saw when I booted Trusty Tahir on sentinel:
Screen 1:
The first screen looked very familiar and a little discouraging...

Screen 2:
The second screen was very encouraging!
sentinel was able to display an identifiable logo and the famous Ubuntu "five dots"...

One neat little trick you can with Ubuntu is that once you see the "five dots" screen, you can gain access to what the Linux kernel is doing, if you press the Esc key. So I was able to see what was going on "under the hood" while the Linux kernel loaded various drivers and tried to configure things. After months of frustration and failure, watching the boot messages scroll up the screen was just great!
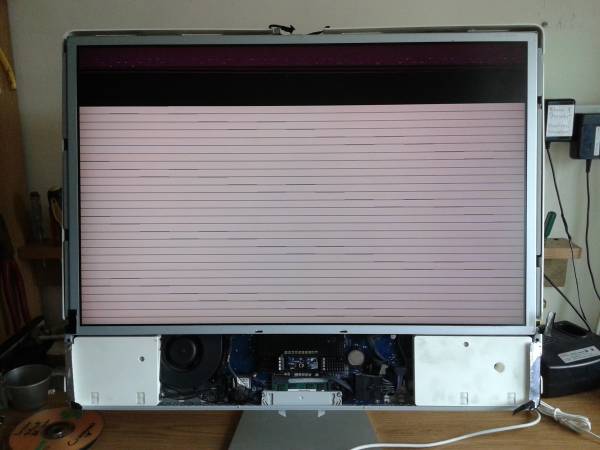
Screen 3:
The third screen was terribly discouraging. The display ended up horribly scrambled. This happened with both Precise Pangolin and Trusty Tahir. I ended up with an unusable display that looked like this:
But all was not lost!
Once I arrived at that messed up screen, I pressed CTRL-ALT-F1 on a hunch. This key sequence used to drop Linux out of its current graphical mode into text mode. I used to use it a lot back in the days of XFree86, when I was forced to program dot clocks for my graphics card to get my X-Windows environment working. If you did it wrong, you could break your monitor, so you needed to get to a command line quickly to terminate things. This key sequence accomplishes that. It gets you to a Command Line Interface (CLI).
Once I pressed CTRL-ALT-F1, sentinel presented me with a command prompt!

Just as soon as I was able to access a command prompt, I quickly did the following things:
1) Change the password for root (the superuser in Linux)
$sudo passwd root
<enter and confirm root password>
2) become root
$su -
<enter root password>
3) Kill gnome-screensaver, a process which flips the video card into a mode from which it cannot, unfortunately, return.
#killall gnome-screensaver
4) Kill ubiquity (the Ubuntu installer program)
#killall ubiquity
5) Kill zenity, which is used to display an error message when ubiquity is terminated.
#killall zenity
After that, I was able to use Trusty Tahir as I do any regular Linux box:
...and that's about it.
This article was about getting sentinel to boot into a useful operating environment, and Trusty Tahir is just that. As a matter of fact, both Precise Pangolin and Trusty Tahir are great Linux distributions - I really like them - but their install media doesn't work right with iMac NVIDIA hardware, which is a shame. It also means that, because I am unable to run the install program, I will have to finalize the install of Ubuntu Trusty Tahir Linux on sentinel by hand. In other words, *I* will be the install script. I have never built a Linux system from scratch before...I am certain it will be very interesting!
Thus, my article on getting a White 24" Core 2 Duo iMac to boot *anything* draws to a close. The story of how I finalized the install of Ubuntu Trusty Tahir on sentinel is told in my (upcoming) Manually Installing Linux From Scratch article.
References
Bekerman, J. (2014) Hear the Evolution of Apple's Iconic Startup Sound for the Mac [Online] Available from: https://www.wired.com/2014/10/apple-mac-startup-sound/ (Accessed: 2017-03-15).
EveryMac.com (2006) Apple iMac "Core 2 Duo" 2.33 24-Inch Specs [Online], Available from: http://www.everymac.com/systems/apple/imac/specs/imac-core-2-duo-2.33-24-inch-specs.html (Accessed: 2017-03-14).
EveryMac.com (n.d.) Sort, Filter & Select Mac Specs - EveryMac.com's Ultimate Mac Sort [Online] Available from: http://www.everymac.com/ultimate-mac-sort/ (Accessed: 2017-03-14).
EveryMac.com (2007) White Intel iMac Q&A - Revised September 2, 2007 [Online], Available from: http://www.everymac.com/systems/apple/imac/faq_cd/differences-between-imac-core-2-duo-models.html (Accessed: 2017-03-14).
EveryMac.com (2008) Why are the MacBook Pro "Core 2 Duo" models limited to 3 GB of memory? If I install dual 2 GB modules, why won't I be able to use 4 GB of RAM? [Online] Available from: http://www.everymac.com/systems/apple/macbook_pro/faq/macbook-pro-core-2-duo-3-gb-memory-limitation-details.html (Accessed: 2017-03-15).
Galan, W. (n.d.) Installing Mac OSX 10.5 Leopard [Online], Available from: https://www.ifixit.com/Guide/Installing+Mac+OS+X+10.5+Leopard/751 (Accessed: 2017-03-15).
MacSales.com (n.d.) Mac OS Support Guide [Online], Available from: https://eshop.macsales.com/guides/Mac_OS_X_Compatibility (Accessed: 2017-03-14).
Parrot175 (2016) Apple iMac Late 2006 Intel Core 2 Duo (2016 Review) [Online], Available from: https://www.youtube.com/watch?v=jbHluGmc_uI (Accessed: 2017-03-15).
Ubuntu documentation (n.d.) Intel_iMac (Unsupported Version) [Online], Available from: https://help.ubuntu.com/community/Intel_iMac (Accessed: 2017-03-14).
Ubuntu documentation (n.d.) MacBook [Online], Available from: https://help.ubuntu.com/community/MacBook (Accessed: 2017-03-14).
Ubuntu wiki (n.d.) iMacIntel [Online], Available from: https://wiki.ubuntu.com/iMacIntel (Accessed: 2017-03-14).
VEOTech (2016) The iMac late 2006 - Is it obsolete? [Online], Available from: https://www.youtube.com/watch?v=fNxsgQMRi_I (Accessed: 2017-03-15).
Nice article, very well documented journey! I am running lubuntu 16 (xenial) on a very similar box, the 2.16MHz Core 2 Duo. I'm wondering if you found that the 4 gig of RAM is addressable under *nix?
ReplyDeleteHello, if I remember correctly, I could only see 3Gb under linux.
DeleteI have one of these white imac 24 with Debian and SSD, bought it many years ago.
ReplyDeleteI havent really used it though after I fixed it, it was booiting when I bought it but since Apple had discontinued it I thought it would be a security hazard.
So the main issue was the Nvidia driver, I also put Steam on it, but it was very slow on the Nvidia GPU from that time :-P But nonetheless I got everything working, like screen adjustment, Nvidia GPU, Wi-Fi.