Here's What To Do When The Above Happens To Your Linux Install!
Happy Days: Bringing an iMac Back From the Dead
Recently, I wrote an article about getting a White iMac 24" Core 2 Duo 2.33 to boot *anything*. In that article, I described how tough it was to get an iMac A1200 (2100) to load a useful operating environment. This turned out to be quite a challenging project, with lots of failure and frustration along the way. But in the end, I managed to get the machine (which I christened sentinel) to boot a version of Ubuntu Trusty Tahir (14.04.5) that had been specially modified for the iMac family of computers.
The reason why I am documenting my experience of installing Linux on what is generally considered to be an extremely old iMac, beyond a desire to document my activities and an aversion to discarding what I consider to be perfectly good computing hardware, is the fact that I want to save others the hassle of figuring this out, and there are lots of this model of iMac available for cheap on eBay, mostly because it won't run the latest version of OSX. So if you are on a budget, or simply have an iMac A1200 lying around and want to try running Linux on it, this guide is for you!
Implementing Operating System Persistence
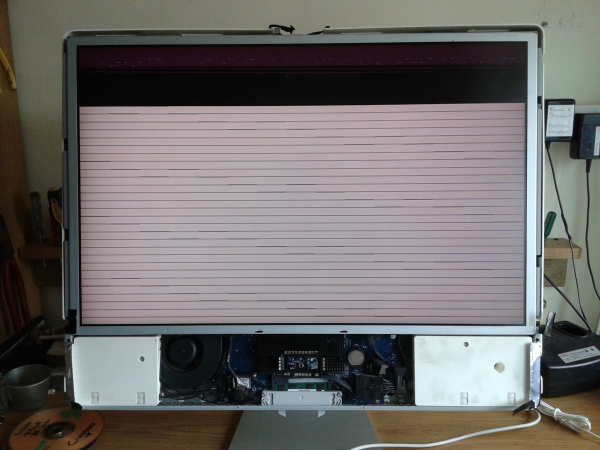
There was a catch with the "solution" I described in my article about getting the iMac to boot *anything* (which was really a story about it basically booted *nothing*). The operating environment thus created was non-persistent. This meant that that whatever changes I made to the machine were lost every time it was turned off or rebooted. The reason behind this was simple: sentinel was being booted via an Install DVD.This method worked, but it had certain shortcomings. This booting method was a bit of a hit-and-miss affair: I often had to reboot sentinel up to ten times to be able to "drop to a shell" via CTRL-ALT-F1. Also, as I worked through this document and discovered things, an increasingly long list of post-boot setup procedures needed to be performed to customize or enhance the operating environment, which was lost at each reboot. The difficulty of the entire exercise was further compounded by the fact that sentinel was loading the wrong video driver (see the above picture), severely hampering my efforts. None of these problems could be permanently fixed because the underlying filesystem that sentinel presented to me was non-persistent; either in-memory (virtual) or read-only (DVD).
A Very Strange (Unique?) Installation Situation
Up front, I must say that the situation with sentinel was a little weird. Normally, Ubuntu Install DVD discs work just fine. But when it came to sentinel this was not the case. Originally, I thought that it was a broken video card, but then I proved that to be untrue by booting into a perfectly functional GUI (the rEFInd boot DVD). Unfortunately, I had also proven that obtaining a GUI to text interface on sentinel was impossible with many of the most popular flavors of Linux. Eventually, I discovered that sentinel was able to boot *something* - Ubuntu Trusty Tahir - but even that victory was qualified: The Ubuntu install program (ubiquity) didn't display properly because the wrong video card drivers were being loaded. So I was forced to boot sentinel by cranking the Ubuntu Trusty Tahir Install DVD into its SuperDrive, waiting for a messed up video screen to appear, and then trying to drop away from that screen to a Command Line Interface (CLI). When it worked, it was better than nothing...but not much.
sentinel Boot Screens
When sentinel was booted with the Ubuntu Trusty Tahir (14.04.5) Install DVD that had been customized for the iMac family of machines, I was presented with the following:Screen 1:
First, I was presented with a glowing white screen:

Screen 2:

Screen 3a:
If I did nothing, I would see this:

Screen 3b:
If I pressed Esc upon seeing the Ubuntu "Five Dots" screen above, I would see this:

With experience, I found that if I pressed Esc my chances of obtaining a command prompt increased dramatically, so I started to press Esc whenever I saw the Ubuntu "Five Dots" screen.
Screen 4:
I usually ended up with a scrambled screen and an unresponsive keyboard and mouse:
At that point, I would try pressing CTRL-ALT-F1 to try to switch the computer to a Command Line Interface (CLI), this worked about 10% of the time. When I was successful with CTRL-ALT-F1, here's what I saw:

I did a lot of rebooting while figuring things out.
sentinel Initial Post-Boot Operations
As soon as I could access the command prompt, I performed the following operations:1) I changed the password for root (Linux Superuser)
ubuntu@ubuntu:~$ sudo passwd root
<enter and confirm root password>
2) I became the Superuser (root)
ubuntu@ubuntu:~$ su -
<enter root password>
3) I killed ubiquity, the Ubuntu installer program
root@ubuntu:~# killall ubiquity
4) I killed the gnome-screensaver process, which flips the video card into a mode from which it cannot return.
root@ubuntu:~# killall gnome-screensaver
5) I killed the zenity process, which displays an error message when ubiquity is terminated.
root@ubuntu:~# killall zenity
OK, We Have a Command Line Interface - Now What?
After I killed the ubiquity process, sentinel stopped bouncing back into "scrambled graphics" video mode from text mode, something it was prone to do. At that point, the machine became much more accessible and useful. I could issue commands and operate the machine like any other Linux box. Luckily, the boot process included obtaining an IP address for sentinel, so it was connected to the Internet. That turned out to be a very useful thing indeed. At the top of the next screen shot, you can see me obtaining the IP address that had been assigned to sentinel by my DHCP server:
Critical Steps to Perform on the Target Machine
Once I had stabilized sentinel into text mode, I performed a handful of critical operations:1) I updated the Ubuntu Trusty Tahir operating environment:
root@ubuntu:/# apt-get update
.
.
.
(lots of output here)
2) I installed SSH, to enable remote access to the machine:
root@ubuntu:/# apt-get install ssh
.
.
.
(lots of output here)
3) I obtained the IP address that had been assigned to the machine:
root@ubuntu:/# ifconfig | grep "inet addr"
inet addr:192.168.11.11 Bcast:192.168.11.255 Mask:255.255.255.0
inet addr:127.0.0.1 Mask:255.0.0.0
4) I changed the machine name to sentinel:
root@ubuntu:/# hostname
ubuntu
root@ubuntu:/# hostname sentinel
root@ubuntu:/# hostname
sentinel
5) I created a non-privileged user for ordinary operations and to access sentinel via SSH (remote access):
root@ubuntu:/# adduser graham
<enter
password>
At that point, I had accomplished everything I needed to on the physical machine and could use my PC to finalize the install. The reasons for my relocation were myriad:
- sentinel was set up on my workbench, which is a standing desk, and I don't find it terribly comfortable to work at a standing desk for hours and hours.
- My PC is located in my home office, which is very comfortable.
- I was documenting this install on my PC, and could easily cut & paste the display of my SSH window into this document.
- This gave me a terrific excuse to document how to manually install Linux from scratch over SSH.
Using SSH to access sentinel
On my home office PC, I fired up putty, a free SSH client. I entered the IP address that I had collected from sentinel (192.168.11.11) and clicked on Save.I then clicked on Open:

The first time you attempt to access a remote machine with putty, it will display a window that asks about whether or not it is OK to create shared security credentials with the remote machine:

I clicked on the Yes button.
At that point, I was presented with a login screen, whereupon I logged in as the non-privileged user (graham), and then immediately assumed the superuser (root) role:

It was at this point that I could start to set up sentinel by hand.
Setting up a Linux Machine By Hand
One important aspect of setting up a Linux machine quickly and easily is being familiar with details concerning the underlying hardware. Linux likes people who know specifications.
What RAM Are We Dealing With?
Knowing the amount of physical memory (RAM) available is important for setting up a Linux machine. This is NOT always how much physical ram is installed in the machine, nor what is being displayed in the BIOS setup screen (if such a screen is available). Fortunately, the amount of RAM available to Linux can discovered with the free command:root@sentinel:~# free -h
total used free shared buffers cached
Mem: 2.9G 221M 2.7G 1.2M 20M 98M
-/+ buffers/cache: 103M 2.8G
Swap: 6.0G 0B 6.0G
The output of free shows that sentinel has 2.9Gb of RAM available.
What Hard Drive Are We Dealing With?
Another important thing to know when installing a Linux machine is what kind of persistent storage (i.e. hard drives) is/are available. This can be discovered with the lsblk command:root@sentinel:~# lsblk
NAME MAJ:MIN RM SIZE RO TYPE MOUNTPOINT
sda 8:0 0 465.8G 0 disk
sr0 11:0 1 1G 0 rom /cdrom
loop0 7:0 0 1007.1M 1 loop /rofs
The output of lsblk shows that sentinel has a hard disk named sda of size 465.8G.
(Actually, I already knew what disk(s) sentinel had. This is because I had installed a 500Gb Seagate Barracuda 7200.10 hard disk in it as part of a previous article, Getting a White 24" Core 2 Duo iMac to Boot *Anything*).
Hard Drive Partitioning
In the spirit of keeping things simple, I decided to give sentinel a very basic hard disk architecture, with only two (2) partitions on the hard disk:- Partition 1 = A swap partition
- Partition 2 = A Linux partition
Here's why these partitions exist:
Partition 1: A swap partition
The swap partition is a necessary piece of Linux infrastructure. It is used by the Linux operating system as part of its "working memory" strategy, should physical RAM should ever become full. When RAM becomes full, the Linux operating "page" memory in and out of the swap area to disk. This has the effect of basically extending RAM capacity beyond its physical limits.Strangely, even though sentinel had 4Gb of ram installed...

free was saying that sentinel only had 2.9Gb of RAM.
Where did the "missing" 1.1Gb of RAM go?
As things turned out, the story of the "missing" RAM tracked back to inherent limitations of the Intel 945 Express chipset used in this particular iMac model. Despite the fact that sentinel had a 64-bit CPU and could potentially address far more RAM, 3Gb is the limit because of the memory controller used, which only has a 32-bit addressing capability. The limit of 32 bit addressing is 4Gb. So be it. Now we know.
Sizing the swap partition:
Back in the old days, we always sized the swap partition at twice the size of physical RAM, but that was when machines had very small RAM footprints (under 1Gb). Using that old rule of thumb, sentinel should have a 6Gb swap partition. Easy. But times have changed. Machines now have a lot of RAM, so I had a suspicion that a 6Gb swap partition might be overkill. Following an investigation, I found out I was right. Redhat now advises the following swap partition sizes:
According to the Redhat guide, sentinel (which falls into the smallest category) should have "a minimum of 2GB of swap space". But the Redhat guide doesn't specify a maximum, which I found a bit bothersome. I also didn't like the "a minimum of" stuff very much. On the other hand, the Ubuntu Swap FAQ uses a slightly different format for its partition size recommendations - and it does specify maximum sizes:

The Ubuntu chart enabled me to arrive at what I thought was a better conclusion, mostly because it provided better quality information. Seeing as I don't intend to ever hibernate sentinel, it seemed like I could get away with allocating as little as 2Gb of swap - the same number as Redhat recommends. So far so good. But considering the fact that Hard Disk space is ample and cheap - and re-organizing disks is a risky business - I could splurge by allocating 5Gb to the swap partition, which would reserving me right to enable hibernation should I ever want to.
Now, had I just gone ahead and used my "rule of thumb", I would have allocated the same amount as the maximum recommended by Ubuntu, 6Gb, so I decided to just give sentinel 6Gb of swap space. Like I mentioned, swap partitions are tricky to resize after the fact. You never know what might happen. Also, 6Gb is a negligible amount of the entire Hard Disk capacity (under 2%), so "going large" doesn't really impact things all that much, so why not? Besides, the rest of the Hard Disk is going to be allocated to Linux, which should leave plenty of space. If I ever need more room, I have a both a large NAS and local USB storage available in the form of a nifty Arctic White Western Digital 320Gb My Passport disk:

sentinel Partitioning Strategy:
In the end, I settled on the following partitioning strategy for sentinel:<swap> 6Gb
Linux <rest of disk>
In terms of prepping the newly installed (but used) hard disk, I wanted to see if any pre-existing partitions existed on it. Knowing from lsblk that it was device /dev/sda, I used the fdisk command to see if there were any pre-existing partitions on it:
root@sentinel:~# fdisk -l /dev/sda
Disk /dev/sda: 500.1 GB, 500107862016 bytes 81 heads, 63 sectors/track, 191411 cylinders, total 976773168 sectors
Units = sectors of 1 * 512 = 512 bytes
Sector size (logical/physical): 512 bytes / 512 bytes
I/O size (minimum/optimal): 512 bytes / 512 bytes
Disk identifier: 0x0006ab4e
Device Boot Start End Blocks Id System
/dev/sda1 * 2048 976773167 488385560 7 HPFS/NTFS/exFAT
Unsurprisingly, a pre-existing partition existed. It needed to be deleted before I could proceed with my Linux install, so I used fdisk to delete it:
root@sentinel:~# fdisk /dev/sda
Command (m for help): p
Command (m for help): p
Disk /dev/sda: 500.1 GB, 500107862016 bytes

81 heads, 63 sectors/track, 191411 cylinders, total 976773168 sectors
Units = sectors of 1 * 512 = 512 bytes
Sector size (logical/physical): 512 bytes / 512 bytes
I/O size (minimum/optimal): 512 bytes / 512 bytes
Disk identifier: 0x0006ab4e

   Device Boot      Start         End      Blocks   Id  System
/dev/sdb1            2048   623769599   311883776   83  Linux

Command (m for help): d
Selected partition 1

Command (m for help): p

Disk /dev/sda: 500.1 GB, 500107862016 bytes

81 heads, 63 sectors/track, 191411 cylinders, total 976773168 sectors
Units = sectors of 1 * 512 = 512 bytes
Sector size (logical/physical): 512 bytes / 512 bytes
I/O size (minimum/optimal): 512 bytes / 512 bytes
Disk identifier: 0x0006ab4e

   Device Boot      Start         End      Blocks   Id  System

Command (m for help): w
The partition table has been altered!

Calling ioctl() to re-read partition table.
Syncing disks.
Now that I had a "fresh" hard disk, with no partitions, it was time to start the Linux install.
The Swap Partition
Here are the specifications of the swap partition intended for sentinel:- 6Gb in size
- formatted as swap
- Not bootable
Here's how to create the swap partition using the fdisk command:
root@sentinel:~# fdisk /dev/sda
Command (m for help): n
Partition type:
   p   primary (0 primary, 0 extended, 4 free)
   e   extended
Select (default p): p
Partition number (1-4, default 1): 1
First sector (2048-976773167, default 2048): 2048
Last sector, +sectors or +size{K,M,G} (2048-976773167, default 976773167): +6G

Command (m for help): t
Selected partition 1
Hex code (type L to list codes): 82
Changed system type of partition 1 to 82 (Linux swap / Solaris)

Command (m for help): p

Disk /dev/sda: 500.1 GB, 500107862016 bytes
255 heads, 63 sectors/track, 60801 cylinders, total 976773168 sectors
Units = sectors of 1 * 512 = 512 bytes
Sector size (logical/physical): 512 bytes / 512 bytes
I/O size (minimum/optimal): 512 bytes / 512 bytes
Disk identifier: 0x0006ab4e

Device Boot      Start   End          Blocks    Id  System
/dev/sda1        2048    12584959     6291456   82  Linux swap / Solaris

Command (m for help): w
The partition table has been altered!

Calling ioctl() to re-read partition table.
Syncing disks.
When a swap partition is newly created, it needs to be formatted using the mkswap command:
root@sentinel:~# mkswap /dev/sda1
mkswap: /dev/sda1: warning: don't erase bootbits sectors
        (dos partition table detected). Use -f to force.
Setting up swapspace version 1, size = 6291452 KiB
no label, UUID=bf0611de-e118-4c74-9b7d-501cc41e0b98
Creating the Linux Partition
Here are the specifications of the Linux partition intended for sentinel:
- <rest of disk>
- ext2 formatted
- Bootable
Here's how to create the Linux partition using the fdisk command:
root@sentinel:~#
fdisk /dev/sda
Command (m for help): n
Partition type:
p primary (1 primary, 0 extended, 3 free)
e extended
Select (default p): p
Partition number (1-4, default 2): 2
First sector (12584960-976773167, default 12584960): 12584960
Using default value 12584960
Last sector, +sectors or +size{K,M,G} (12584960-976773167, default 976773167):
Using default value 976773167
Command (m for help): a
Partition number (1-4): 2
Command (m for help): p
Disk /dev/sda: 500.1 GB, 500107862016 bytes
97 heads, 17 sectors/track, 592342 cylinders, total 976773168 sectors
Units = sectors of 1 * 512 = 512 bytes
Sector size (logical/physical): 512 bytes / 512 bytes
I/O size (minimum/optimal): 512 bytes / 512 bytes
Disk identifier: 0x0006ab4e
Device Boot Start End Blocks Id System
/dev/sda1 2048 12584959 6291456 82 Linux swap / Solaris
/dev/sda2 * 12584960 976773167 482094104 83 Linux
Command (m for help): w
The partition table has been altered!
Calling ioctl() to re-read partition table.
Syncing disks.
Linux partitions need to be formatted with the mkfs command before they can be used:
root@sentinel:~# mkfs /dev/sda2
mke2fs 1.42.9 (4-Feb-2014)
Filesystem label=
OS type: Linux
Block size=4096 (log=2)
Fragment size=4096 (log=2)
Stride=0 blocks, Stripe width=0 blocks
30138368 inodes, 120523526 blocks
6026176 blocks (5.00%) reserved for the super user
First data block=0
Maximum filesystem blocks=4294967296
3679 block groups
32768 blocks per group, 32768 fragments per group
8192 inodes per group
Superblock backups stored on blocks:
32768, 98304, 163840, 229376, 294912, 819200, 884736, 1605632, 2654208,
4096000, 7962624, 11239424, 20480000, 23887872, 71663616, 78675968,
102400000
Allocating group tables: done
Writing inode tables: done
Writing superblocks and filesystem accounting information: done
Bringing the Newly Formatted Disk Online
Now that the swap partition and Linux partition have been created and formatted, I brought the new disk online.Activating the swap partition:
The swap partition can be activated using the swapon command with the /dev/sda1 parameter:
root@sentinel:~# swapon /dev/sda1
root@sentinel:~#
root@sentinel:~#
The free command with the --human parameter can be used to check that the swap partition has been activated:
root@sentinel:~# free --human
             total       used       free     shared    buffers     cached
Mem:          2.9G       549M       2.4G       115M       133M       238M
-/+ buffers/cache:       177M       2.7G
Swap:         6.0G         0B       6.0G
Activating the Linux partition:
Activating the Linux partition was a matter of using the mkdir command to create a position in the boot DVD filesystem for the partition to be attached, and then using the mount command.
First, I created a subdirectory of the existing /mnt directory called hdd:
root@sentinel:~# mkdir /mnt/hdd
root@sentinel:~# ls /mnt
root@sentinel:~# ls /mnt
Then I used the mount command to make the new partition available:
root@sentinel:~# mount /dev/sda2 /mnt/hdd
root@sentinel:~# ls /mnt/HDD
lost+found
root@sentinel:~# ls /mnt/HDD
lost+found
Curious to know exactly how much space I had created on /dev/sda2, I used the df command to find out:
root@sentinel:~# df --human /dev/sda2
Filesystem Size Used Avail Use% Mounted on
/dev/sda2 453G 4.0K 453G 1% /mnt/hdd
Filesystem Size Used Avail Use% Mounted on
/dev/sda2 453G 4.0K 453G 1% /mnt/hdd
OK, I had a total of 453Gb of room on /dev/sda2, of which a negligible amount had been used. Good to know.
Now that the two partitions had been brought online, I was able to proceed with the Linux install on the Hard Disk Drive (HDD) and move away from using the boot DVD to start sentinel. This is covered in (iMac) Ubuntu Install Gone Wrong? Install by Hand! (2 of 2).
No comments:
Post a Comment